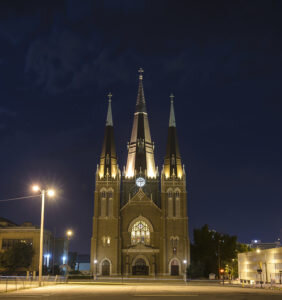
I love to get out and shoot images after dark. The world is a different place after the sun goes down. There are new colors hiding just beneath our visual perception which a camera can pick up using long exposures. It is a surreal world of naturally over-saturated tones caused by unnatural industrial lights of many different types. It is a world most people don’t take notice of. No one thinks about what the local library looks like illuminated by the full moon. Few know that the orange sodium street lamps cause the slight dew coated pavement on main street to glisten at one in the morning.This post is the start of a series in which I will teach you the techniques needed to capture the night. I will cover the many different techniques you need to know. If you are already a seasoned daytime photographer, good, but much of what you’ve learned does not apply at night. Night photography pushed well beyond what even modern camera systems can handle. You can no longer trust what your camera thinks is correctly exposed. In truth, you can’t even trust your own eyes, at least not at first.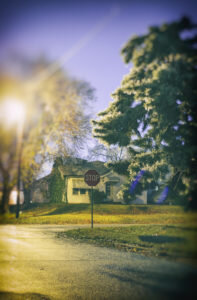
 With this post I will cover the essential equipment you must have in order to attempt night photography. These are things you need to have. They are not optional.
1. A Camera
Let’s start with a camera. You must have a camera, no ifs, ands, or buts. Without a camera you will not be taking pictures.Also, you must have a camera that has a ‘Manual’ mode. This means that you will have to control all of the settings yourself. In auto mode your camera will figure out everything for you. In shutter speed mode your camera let’s you choose your shutter speed but adjusts all of the other settings to get a correctly exposed image. Aperture mode let’s you choose your aperture, how wide open your lens is, and adjusts all of the other settings for a correct exposure. There is also a program mode, which is somewhere between Aperture(or Shutter) mode and manual.I shoot with a Nikon d610. By no means should you run out and buy one though. You don’t need the top of the line pro level camera to do night photography. I would love to get a hold of the recent Nikon D5, it has ridiculously high ISO capabilities, but I’m not ready to drop over six grand for a camera. Really, even a point and shoot camera that gives you a full manual mode will work. You could even shoot with a pinhole camera that uses 35mm film, though I wouldn’t suggest it until you master all of the techniques I will go over in the coming posts with a digital camera. Just be sure you can attach it to the next essential piece of gear…
2. A Tripod
I cannot say this enough times for both night and day photography, but especially night photography:Use A Tripod! Use A Tripod! Use A Tripod!
You don’t need a high dollar carbon fiber Manfrotto tripod. You just need something sturdy. If you don’t have one and your budget is limited just get a cheap Targus tripod. You can get one at Wal-Mart for under $20. This tripod is a little unstable, but it will work. It will hold much more still than you will be able to with your hands.
If you have more of a budget to spend opt for something more heavy and not made of plastic. Also stay away from tripods that advertise as compact or portable. I have two tripods. One is a heavier think metal one that doesn’t fold down particularly small. The other is a thinner one that folds small enough to fit in my backpack. They are both great tripods, but the heavier one has much less shake and is less likely to be affected by the wind. The smaller one has more joints and has thinner legs, and thus has a little shake to it when a gust of wind comes through.One way you can reduce any tripod movement is to weight it down. Some more pricey tripods have hooks on the bottom of the central shaft. These are great for hanging your camera bag on. Some even bring a small bag to fill with rocks on site and then hang on the bottom of their tripod. If your tripod does not have this hook, do not fret. There are inexpensive solutions that add a hanging pouch that attaches to the three legs or your tripod. The one I use attaches with Velcro and easily holds my camera bag for me, thus weighing down my tripod and making it much more sturdy.
There are also super small table top tripods and gorilla pods. These are great as well and super easy on the wallet. The gorilla pod is a lot of fun. It can be morphed to hold your camera on any surface. It can even wrap around smaller poles to hold your camera as long as your camera isn’t too heavy.You can also do some night photography without a tripod, but you will be extremely limited without one. One way to keep your camera steady without a tripod is to set it on a surface. You can set it on top of a backpack on top of your car or even on the ground.You can also do abstract night photographs by moving your camera during the exposure. This will let you draw shapes with the bright lights in the picture.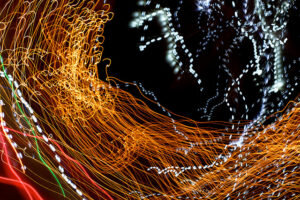 Another piece of gear that helps reduce shake in your images is…
3. A Remote Trigger
There are a large range of options when it comes to remote triggers. You can get something super affordable and reliable (like a little infrared off-brand trigger from Target), or you can go all out and get professional level wireless remote triggers that are guaranteed to work all of the time(like Pocket Wizards).The soul purpose of using a remote trigger for night photography is the same is as using a tripod: to reduce every bit of shake possible.This is needed, in especially modern DSLR cameras, because even the act of taking a picture causes shake. Your finger pressing the button or even touching the camera will cause shake for a good five seconds, and DSLR cameras have a mirror that needs to move up and out of the way in order for the sensor to record light.You can get away without using a remote trigger if your camera has a couple features.1. Mirror upWhen this is turned on you will need to press the shutter button twice in order the take a picture. The first press moves the mirror up and the second actually exposes the sensor. This is beneficial because it gives your camera the chance to stop shaking from the mirror movement before exposing the sensor.Even with mirror up turned on you still will get shake from pressing the shutter button. To get around this use your camera’s…2. DelayDelay is usually used by photographers when they want to jump into their own pictures. In this case it is used to allow time to pass, and shake to stop, after the shutter button is pressed and before the sensor is exposed.With these two features combined you really don’t need a remote trigger at all. But the down side is there is a large delay between pressing the button and taking the picture.There are cheap options to alleviate this issue though. The solution is to move the shutter button off from the camera. (Be sure to leave the mirror up feature on even with a remote trigger)
One option is to purchase an inexpensive infrared trigger. Make sure that your camera supports these before buying one. I have a cheap one from target that works for Nikon, Canon, and a few other brands of camera. I think it cost me less than $20 and it works great.
Most of the time I prefer to use wired triggers. I really hate having to keep up with batteries, so anything that I can do to reduce the number of powered doohickeys I have to keep batteries for the better. For a long time I used a single button wired trigger. It worked wonders. The trick is to do your best to not pull in the wire when using it and to make sure it isn’t swinging around during the exposure. I usually wrap it around one of my tripod’s legs before I press the button.Currently I use a programmable trigger. It has a button that you can push, just like the single button trigger, but it can also be set up to take a series of exposures. You just tell it how many you want, how long each exposure should be, how long it should wait between exposures, and how long it should wait before starting the first exposure. Once you have all of this set you just press go and sit in the folding chair you conveniently brought along with you.
Conclusion
There are many more little gadgets that you can purchase to use for night photography, but a camera, tripod, and remote trigger will carry you a very long way before you need anything else. If you have these items already, get out there and take some amazing night photographs. Feel free to post your images in the comments, I would love to see what you capture. A note on the cost of photography equipment.Photography can be an expensive hobby, but this is true of many hobbies. Like golf or spelunking the equipment can quickly put a dent in your bank account. Here’s the thing though, most camera’s are pretty expensive, and I don’t trust my camera or lenses to equipment that may cause them damage. This is why I save up and get the more pricey tripod from a well known brand. This is also why I tend to watch reviews on Amazon even for things like wired triggers to make sure no one has had issues with it messing up a port on their camera. In most things, including photography, you get what you pay for. So save up and make sure you pay for something that will correctly safeguard your equipment.